|
Important
|
Introduction
- The Altera® SoC FPGA Embedded Development Suite (SoC EDS) is a suite of tools for embedded software development for SoC FPGAs.
- The most important changes in SoC EDS ver. 20.1 are
- The following components are no longer included in the SoC EDS package
- Software Integrated Development Environment tool: Arm® Development Studio SoC FPGA Edition (formerly Arm® DS-5)
- Bare-metal GCC compiler: Linaro bare-metal toolchain (formerly Mentor® Sourcery™ CodeBench Lite ARM Altera EABI)
- Cygwin
- Users must download and install Arm® Development Studio SoC FPGA Edition (Arm® DS) separately. DS is the successor to Arm® Development Studio 5 SoC FPGA Edition (Arm® DS-5) and provides the same functionality.
- The bare-metal GCC compiler and Cygwin must also be downloaded and installed separately.
- The following components are no longer included in the SoC EDS package
- This section describes how to install SoC EDS. The installation consists of the following steps
- Download and install SoC EDS
- Download and install Arm® DS
- Download and install the Linaro bare-metal toolchain
- In addition to the above, the following must be installed on a Windows machine
- Cygwin - provides a Linux-like environment on Windows and is required to use Embedded Command Shell.
- MinGW - Used as a platform to build the Newlib library used by the Linaro bare-metal tool chain.
Notice.
- Google Chrome is the recommended web browser for downloading (we have confirmed that Internet Explorer does not download the various files required for the development software).
- After ver.20.3 Pro, the components provided as SoC EDS will be provided by GitHub and Rocketboards.org, but we recommend installing ver.20.1 Pro or ver.20.1 Standard, which is the last version of SoC EDS package. Standard, which is the last version of the SoC EDS package.
1. Download SoC EDS
- To download the installation files, go to Download Center.
The screen below shows the result when you select:
Software Type : Embedded Tools
Software Pakage : SoC EDS Standard
Version : 20.1
Operating System : Windows
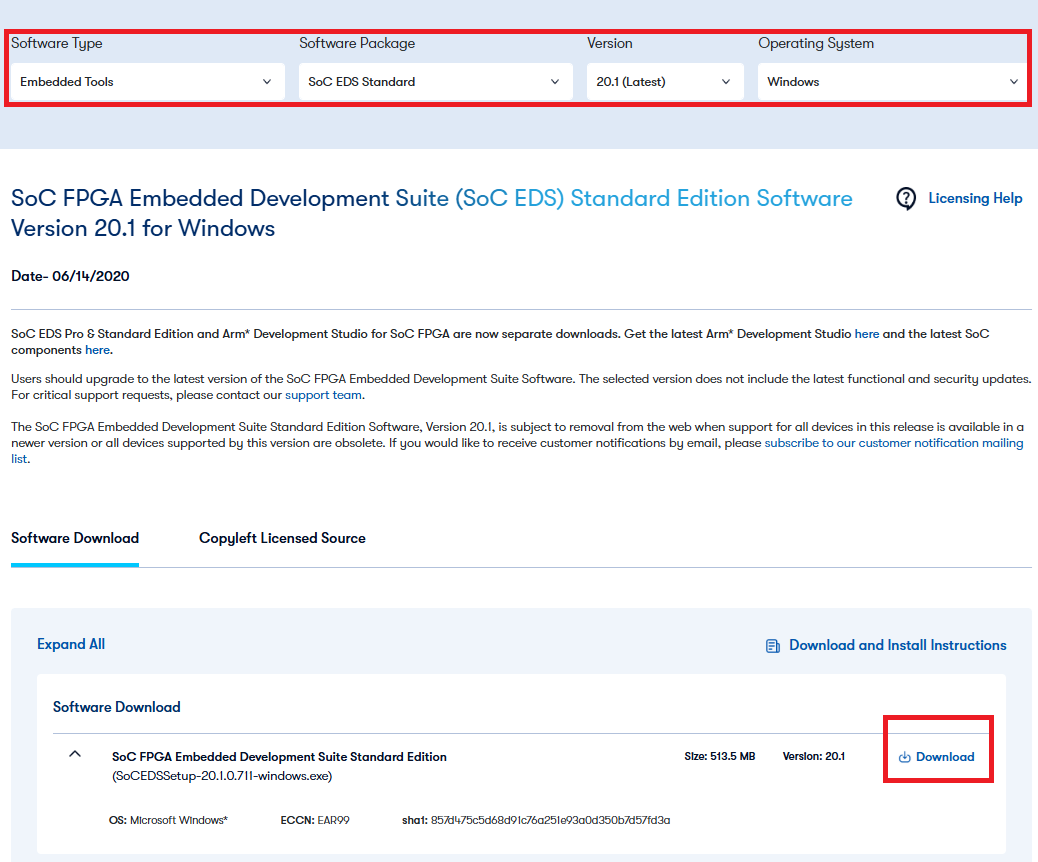
Figure 1. Downloading SoC EDS
2. Installation of SoC EDS
- Execute the following file obtained from the download center.
Table 1. Files obtained from the download center
| Edition of SoC EDS | Downloaded file |
| Pro Edition |
|
| Standard Edition |
|
- The wizard will start. Follow the instructions to proceed with the installation.
Figure 2. Installation Wizard (1)
- If you have already installed Quartus® Prime Programmer and Tools, uncheck Quartus Prime Programmer and Tools.
- If you have already installed Quartus® Prime and want to run Programmer from Quartus® Prime, you can also uncheck the "Quartus Prime Programmer and Tools" checkbox.
Figure 3. Installation Wizard (2)
- This completes the installation of SoC EDS.
- If you wish to use SoC EDS in combination with Quartus® Prime ver. 20.1 or later, please refer to the following information.
Reference: "Configuration for Using SoC EDS with a Different Version of Quartus® Prime Development Software"
- In SoC EDS ver. 20.1 or later, Arm® DS is not automatically installed in SoC EDS. Users need to download and install Arm® DS separately.
3. Installation of Arm® DS
3-1. Arm® DS System Requirements
-
- Please make sure that you meet the system requirements for Arm® DS before installation.
- The OS environment supported by Arm® DS v2020.1 is as follows. All of them require a 64-bit OS environment.
- Windows 10
- Red Hat Enterprise Linux 7 Workstation (or CentOS 7)
- Ubuntu Desktop Edition 16.04 LTS
- Ubuntu Desktop Edition 18.04 LTS
- Please make sure that you meet the system requirements for Arm® DS before installation.
Note: Windows 7 and Red Hat Enterprise Linux 6 (CentOS 6.x) are not supported.
3-2. Download Arm® DS
-
- Download the Arm® DS installer archive from the Download Center page.
Note: It is recommended to install the latest version of Arm® DS, as bugs may have been fixed.
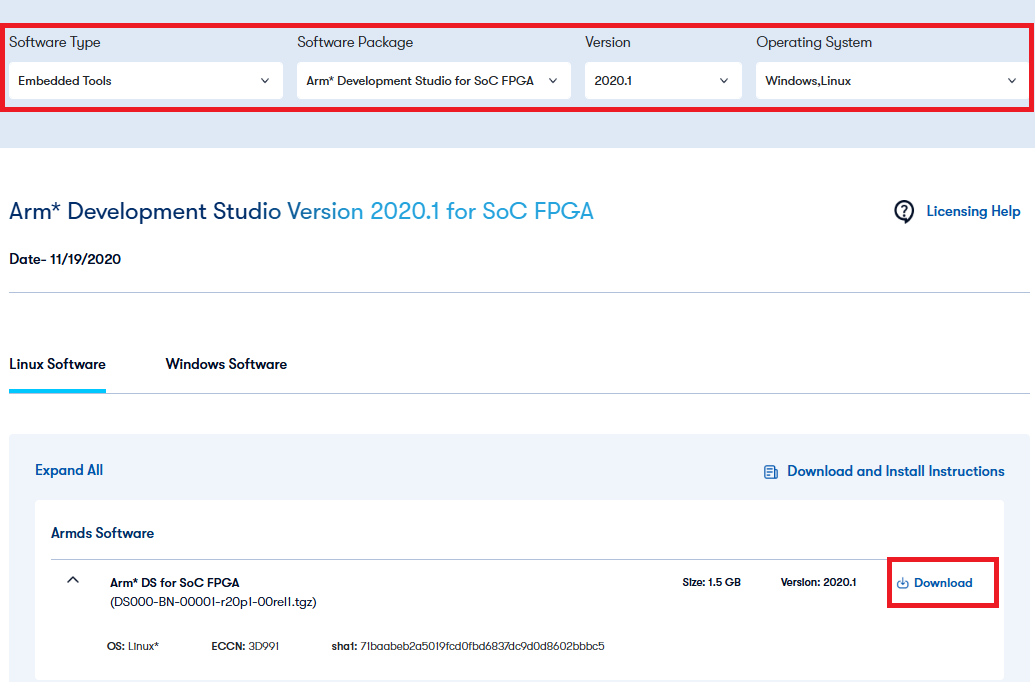 Figure 4. Download Arm® DS Installer
3-3. Installation of Arm® DS (Linux OS)
(1) Extract the installer archive (.tgz) and extract the installer file. (example for v2023.1)
$ tar xf DS000-BN-00001-r23p1-00rel1.tgz(2) Run the installer as root.
$ cd DS000-BN-00001-r23p1-00rel1/
$ sudo ./armds-2020.1.sh
(3) Display the license article to the end, confirm that you accept the contents of the license, then type 'yes' and press Enter (the display of the license article can be paged down by typing the space key).
Please answer with one of: 'yes' or 'no/quit
Do you agree to the above terms and conditions? yes
(4) Press Enter to perform the platform requirement check.
Please answer with one of: 'yes/y' or 'no/n'.
Run installation platform requirement checks?
- Running installation platform requirement checks
Running dependency checks [succeeded]
(5) Leave the default installation path as it is (unless you want to change it) and press Enter to go to.
Where would you like to install to? [default: /opt/arm/developmentstudio-2020.1] ⑥ Press Enter to start the new installation.(6) Press Enter to allow the new folder to be created.
Please answer with one of: 'yes/y' or 'no/n'.
'/opt/arm/developmentstudio-2023.1' does not exist, create?
- Installing to '/opt/arm/developmentstudio-2023.1' (This may take a while...)
(7) Press Enter to allow the desktop menu to be added.
Please answer with one of: 'yes/y' or 'no/n'
Install desktop menu item additions?
- Installing menu entries
(8) Press Enter to allow the driver to be installed.
Post install stage provides the following functions
- Installation of USB drivers for RealView ICE and DSTREAM hardware units
Please answer with one of: 'yes/y' or 'no/n'.
Run post install setup scripts?
- Running post install setup scripts?
(9) If the installation is successful, the following message will appear.
|
3-4. Installation of Arm® DS (for Windows OS)
(1) Unzip the archive and double-click the installer file (.exe ) to execute.
(2) Click [Next] on the Welcome screen.
Figure 5. Click [Next] on the Welcome screen
(3) Confirm that you agree to the terms of the license agreement and click [Next].
Figure 6. Click [Next] after agreeing to the terms of the license agreement
(4) Leave the default installation location as it is (or change it if necessary) and click [Next].
Figure 7. Click [Next] leaving the default installation location as it is (or change it if necessary).
(5) Click [Install] to continue the installation. The tool will be installed and will appear.
Figure 8. Click [Install]
(6) Click [Next] on the "Start Driver Installation" screen.
Figure 9. Driver Installation
(7) Accept all default options for driver installation. Click [Finish] when the driver installation is complete.
Figure 10. Click [Finish] when the driver installation is complete.
(8) Click [Finish] when the driver installation is complete. Click [Finish].
Figure 11. Click [Finish]
4. Cygwin installation (Windows OS only)
- For SoC EDS ver. 20.1 or later, Cygwin must be installed on a Windows machine.
- Cygwin provides a Linux-like environment on Windows and is required for Embedded Command Shell.
(1) Go to https://cygwin.com/ and download the installer ( https://cygwin.com/setup-x86_64.exe) to the
computer.
(2) Start the command prompt as an administrator.
Figure 12. Start Command Prompt as administrator
(3) Change the current directory to cygwin_setup.
-
- For ver. 20.1 Pro:
> cd c:\intelFPGA_pro\20.1\embedded\cygwin_setup\-
- For ver.20.1 Std:
> cd c:\intelFPGA_pro\20.1\embedded\cygwin_setup\(4) Run the soceds-cygwin-setup.bat executable and pass the setup-x86_64.exe installer the full path to the download location (in the example below, it is downloaded to the user's "Downloads" folder).
> soceds-cygwin-setup.bat %USERPROFILE%\Downloads\setup-x86_64.exeor,
> soceds-cygwin-setup.bat C:\Users\<username>\Downloads\setup-x86_64.exe(5) The installer application will be launched.
Figure 13. The installer starts up.
(6) The installer application will complete.
Figure 14. Completion of the installer
(7) The installation of Cygwin is now complete. Please refer to the following information if necessary.
Reference: "Supplement to Cygwin Setup for SoC EDS"
5. MinGW installation (Windows OS only)
- For SoC EDS ver. 20.1 and later, MinGW must be installed on a Windows machine.
- MinGW is used as a platform for building the Newlib library used in the Linaro bare-metal toolchain.
(1) Go to http://www.mingw.org/wiki/Getting_Started and download the https://osdn.net/projects/mingw/downloads/68260/mingw-get-setup.exe installer and run as administrator.
Figure 15. Download the installer and run it as administrator
(2) Click [Install] when the installer application starts up.
Figure 16. Click [Install]
(3) Leave the default settings and click [Continue].
Figure 17. Click [Continue]
(4) Click [Continue] again to continue.
Figure 18. Click [Continue] again to continue
(5) Click mingw-developer-toolkit-bin, mingw32-base-bin and msys-base-bin in the Basic Setup view and select the mark for installation.
Figure 19. Select the mark for installation
(6) Click msys-wget-bin in the All Packages view and select the mark for installation.
Figure 20. Click msys-wget-bin in the All Packages view and select the mark for installation
(7) Select "Installation" -> "Apply Changes" from the top menu. Click [Apply] at to continue.
Figure 21. Click [Apply] to continue
(8) The installer will download all necessary packages.
Figure 22. Downloading packages
(9) When the installer has applied all changes, click [Close].
Figure 23. Click [Close]
(10) From the top menu, select "Installation" -> "Quit".
6. Install the Linaro bare-metal toolchain
- This section shows how to install the Linaro bare-metal toolchain for the Cortex-A9.
- This will help you compile bare-metal programs for Cyclone® V SoC, Arria® V SoC, and Arria® 10 SoC devices.
6-1. Installation of the Linaro bare-metal toolchain (on Linux OS)
(1) Launch Embedded Command Shell.
-
- For ver. 20.1 Pro:
$ ~/intelFPGA_pro/20.1/embedded/embedded_command_shell.sh-
- For ver. 20.1 Std:
$ ~/intelFPGA/20.1/embedded/embedded_command_shell.sh(2) Change the current folder to linaro and run the installation script.
* The install_linaro.sh script file targets only the Linaro bare-metal toolchain for ARMv7 (ARMv8 is not supported).
 $  cd $SOCEDS_DEST_ROOT/host_tools/linaro/
 $  . /install_linaro.sh
(3) When successfully completed, the following will be installed in the $SOCEDS_DEST_ROOT/host_tools/linaro/ folder:
-
- gcc - GCC compiler
- newlib - Newlib library
6-2. Installation of Linaro bare-metal tool chain (for Windows OS)
(1) Run C:\MinGW\msys\1.0\msys.bat as an administrator.
Figure 24. Execute C:\MinGW\msys\1.0\msys.bat as administrator
(2) The Msys console will open.
Figure 25. Msys Console
(3) If you have a proxy on your company network, you need to configure the proxy settings from the Msys console as follows:
$ export http_proxy="http://your.proxy.address:proxy.port"
$ export https_proxy="https://your.proxy.address:proxy.port"
Note: In the above proxy configuration, your.proxy.address means the proxy address and proxy.port means the proxy port number.
(4) Go to the linaro folder in the Msys console.
-
- For ver.20.1 Pro:
$ cd c:/intelFPGA_pro/20.1/embedded/host_tools/linaro-
- For ver. 20.1 Std:
$ cd c:/intelFPGA/20.1/embedded/host_tools/linaro(5) Run the installer.
Note: The install_linaro.sh script file only targets the Linaro bare-metal toolchain for ARMv7 (ARMv8 is not supported).
$ ./install_linaro.sh(6) The Linaro toolchain will be downloaded and the newlib library will be downloaded and compiled. When completed, the following will be installed in the linaro folder.
-
- gcc - GNU compiler
- newlib - Newlib library
7. Installation of the Linaro Linux toolchain
7-1. Start Arm® DS and set up the license file
-
- To specify the path of the Linaro Linux toolchain to Arm® DS, Arm® DS must be started.
- In addition, Arm® DS must be licensed before it can be used.
- Please refer to the following chapter in "How to set up the Arm® Development Studio (DS) for SoC FPGA Edition license" for details.
- 5. Start Arm® DS SoC FPGA Edition
- 6. Set up the license file
7-2. Configure the Linaro Linux tool chain
(1) Select "Preferences" from the "Window" menu of Arm® DS.
Figure 26. Select "Preferences".
(2) From the Preferences window, type too in the search window and select "Toolchains".
Click the [Add...] button.
Figure 27. Select "Toolchains"
(3) Click on "Download GCC Toolchains".
Figure 28. Click "Download GCC toolchains"
(4) Click "Download Arm GNU Toolchain" on the Arm GNU Toolchain page of Arm Developer at.
Figure 29. Click "Download Arm GNU Toolchain"
(5) Download the desired toolchain.
Figure 30. Download the desired toolchain.
(6) After the download is complete, unzip the file (from Embedded Command Shell, use the following command to unzip the file:).
-
- For Window Host:
(example of arm-gnu-toolchain-13.3.rel1-mingw-w64-i686-arm-none-linux-gnueabihf.zip)
- For Window Host:
$ unzip arm-gnu-toolchain-13.3.rel1-mingw-w64-i686-arm-none-linux-gnueabihf.zip-
- For Linux Host:
(example of arm-gnu-toolchain-13.3.rel1-x86_64-arm-none-linux-gnueabihf.tar.xz)
- For Linux Host:
$ tar -Jxvf arm-gnu-toolchain-13.3.rel1-x86_64-arm-none-linux-gnueabihf.tar.xz(7) Click [Browse].
Figure 31. Click [Browse]
(8) Specify the bin folder of the unzipped toolchain, and click Select Folder.
Figure 32. Specify the bin folder of the unzipped toolchain
(9) Click [Next].
Figure 33. Click [Next]
(10) Click [Finish] when the toolchain is detected.
Figure 34. Click [Finish] after the tool chain is detected
(11) Confirm that the tool chain has been added and click [Apply and Close].
Figure 35. Click [Apply and Close]
(12) Click [Restart] to restart Arm® DS.
Figure 36. Click [Restart] to restart Arm® DS
(13) After Arm® DS restarts, open the Makefile of the Linux project (in this example,
Altera-SoCFPGA-HelloWorld-Linux-GNU) and define CROSS_COMPILE to arm-none-linux-gnueabihf- (the original (The original definition is commented out).
Figure 37. Open the Makefile and define CROSS_COMPILE as arm-none-linux-gnueabihf-.
(14) Right-click on the Linux project and select "Properties".
Figure 38. Select "Properties"
(15) Select "C/C++ Build" ⇒ "Tool Chain Editor", select the tool chain to be used and click
[Apply and Close].
Figure 39. Select the tool chain you want to use and click [Apply and Close]
(16) "Build Project" the Linux project and confirm that it can be built.
Figure 40. "Build Project" of the Linux project